Shopify's checkout is famously clean and fast, and you can give your WooCommerce store the same streamlined feel without leaving WordPress.
Shopify has a strong focus on design and user experience. As a result, their checkout page is clean and simple and encourages quick sales.
Luckily, you don't have to switch to Shopify just to access the checkout page design.
Instead, you can implement a Shopify-like design for your WooCommerce checkout page with the help of third-party WooCommerce tools, such as our Botiga theme.
In this tutorial, I'll show you how to use Botiga to make the default WooCommerce checkout page look like Shopify's.
Table of Contents
- What you'll need
- 1. Install and activate the Botiga WooCommerce theme
- 2. Install and activate the Botiga Pro plugin
- 3. Import a starter site (optional)
- 4. Open the Customizer
- 5. Choose a layout design for your checkout page
- 6. Enable or disable the optional features on your checkout page
- Troubleshooting common issues
- Conclusion
What you'll need
To follow this tutorial, you'll need:
- A WordPress site with WooCommerce installed and active
- The free Botiga theme and Botiga Pro (the Shopify-style checkout layouts are a Botiga Pro feature)
Don't want to switch themes? Merchant Pro's Checkouts module adds Shopify-style, multi-step, and one-page checkout layouts on any well-built WooCommerce theme, so you can get a similar result without changing your theme. This tutorial focuses on the Botiga method.
This guide was tested with the current versions of Botiga and Botiga Pro.
1. Install and activate the Botiga WooCommerce theme
Botiga is a feature-rich WooCommerce theme that comes in both a free and Pro version. It offers tons of layouts, styles, and customization options so that you can tailor an exceptional shopping experience for your customers.
To install it on your WordPress site, open your dashboard, and go to Appearance > Themes > Add New.
On the Add Themes admin page, you'll see a search bar. Enter “Botiga”, and the theme will appear among the results.
Hit the Install button, then activate the theme:

Alternatively, you can download Botiga from our website.
Then, go to Appearance > Themes > Add New > Upload Theme in your WordPress admin area.
Click the Choose File button to upload the theme, and hit the Install Now button:

Once the installation is complete, be sure to activate the theme by clicking the Activate link:

2. Install and activate the Botiga Pro plugin
Botiga Pro is a WordPress plugin that adds lots of premium features to the free Botiga theme.
You'll need both the theme and plugin to access the Shopify-style checkout layout.
After purchasing Botiga Pro, download the plugin from your aThemes account or your welcome email.
Then, open your WordPress admin area, and go to Plugins > Add New > Upload Plugin.
Upload the plugin by using the Choose File option, and then hit the Install Now button:

Once the upload process is over, click the Activate Plugin button:

The Botiga Pro plugin is now installed and activated on your WordPress site. For more on setup, please refer to our quick start guide.
3. Import a starter site (optional)
A starter site or demo is a pre-built website design you can use out-of-the-box or slightly modify to achieve a design that works for you. It can save you a lot of time and effort because you don’t have to design your site from scratch.
Currently, Botiga offers ten starter sites to choose from, ranging from Beauty to Books.
You can also use Botiga without importing a starter site, in this case, you'll need to add your own content and configure your settings using Botiga's Customizer options.
To import a starter site, click the Appearance > Starter Sites menu. Click the Preview Demo button to preview the design, and hit the Import button if you want to install it on your website:

In the next instant, a popup will appear showing all the plugins and content that will be imported into your site.
Select the Import button and wait until the process is over:

Once the starter site is imported, open your homepage and check out the new design of your WooCommerce store.
4. Open the Customizer
To open the Customizer, click the Appearance > Customize menu in your WordPress dashboard:

You'll be taken to the homepage of your website, and the Customizer interface will be displayed on the left side of the screen:

The Customizer menu has an option that will convert the layout of your WooCommerce checkout page into one that looks like the Shopify checkout page.
5. Choose a layout design for your checkout page
In the Customizer, go to WooCommerce > Checkout. Here, you'll see five layout options for the checkout page:

Botiga has two checkout page layouts that provide a similar user experience to Shopify:
- Layout 4, Shopify multi-step checkout, which lets customers enter their information step by step.
- Layout 5, Shopify one-step checkout, which includes all the information on one page.
To see how they compare to Shopify, here’s a screenshot of Shopify's checkout page:

This is what the first page of Botiga's multi-step Shopify layout (Layout 4) looks like:

And, here's Layout 5, Botiga's one-step Shopify-like checkout page:

Choose the layout that best fits your needs, then hit the Publish button at the top of the Customizer interface to implement the changes.

That’s it. You have now made your WooCommerce checkout page look like Shopify.
6. Enable or disable the optional features on your checkout page
There are a couple of features you can enable or disable on the checkout page; you can find them right below the checkout layouts in the Customizer.
You can switch the following three options on or off:
- Display coupon form, This option is enabled by default. You can choose to disable it.
- Sticky checkout totals box, You can make the totals box sticky, so when a customer is scrolling up or down, the box remains fixed on the right side of the screen.
- Distraction-free checkout, This option removes the header and footer content, allowing customers to focus on the checkout process.

You can also set the following three form fields to required, optional, or hidden:
- Company Name
- Address Line 2
- Phone

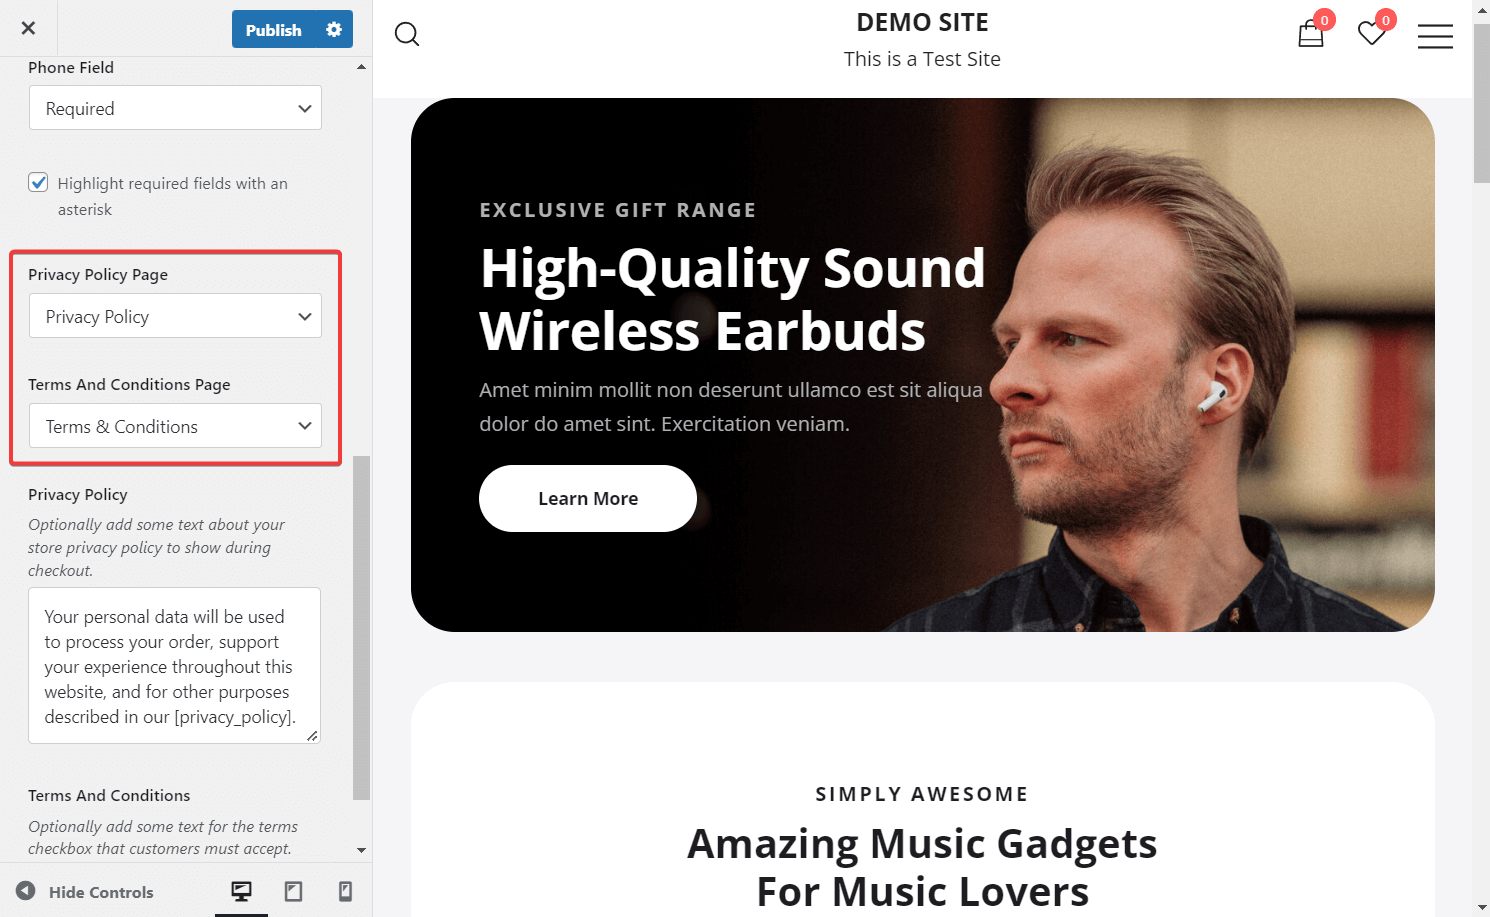
Finally, you can add two important legal documents to your checkout page:
- Privacy Policy
- Terms and Conditions
First, you need to create these pages from the Pages > Add New menu. Then, they'll show up in the dropdowns, and you can add them to your checkout page:
Troubleshooting common issues
- The checkout layout options don't appear: Make sure both Botiga and Botiga Pro are active and your Botiga Pro license is activated. The checkout layouts are a Pro feature.
- Your changes don't show on the live checkout: Publish the Customizer changes, then clear your page cache. Cached checkout pages can keep showing the old layout.
- The layout doesn't apply to a block-based checkout: If your checkout page uses the newer WooCommerce Checkout block, the theme's checkout layout may not apply. Switch the page to the classic checkout shortcode, or use a checkout solution that supports the blocks.
Can I make WooCommerce checkout look like Shopify without switching to Shopify?
Yes. You keep WooCommerce and restyle the checkout. With the Botiga theme and Botiga Pro you enable a Shopify-style checkout layout from the Customizer, with no platform switch.
Do I need a plugin for a Shopify-style WooCommerce checkout?
For the layouts in this guide you need Botiga Pro. If you don't use Botiga, a checkout plugin such as Merchant Pro, FunnelKit, or CheckoutWC can give a similar result on other themes.
Is the Botiga checkout layout free?
The Botiga theme is free, but the Shopify-style checkout layouts require Botiga Pro, which is a paid upgrade.
What makes a checkout feel like Shopify?
A Shopify-style checkout keeps the form minimal, with only the fields needed to complete the order, a clean single or multi-step layout, and a distraction-free design that speeds up purchase.
Will the new checkout work on mobile?
Yes. Botiga's checkout layouts are responsive, so they adapt to phones and tablets. Always preview your checkout on a mobile device before going live.
Conclusion
WooCommerce is an excellent eCommerce platform, but if you want to improve certain areas of your store, such as the checkout, third-party tools can help a lot.
For example, you can use Botiga to make the default WooCommerce checkout page similar to the clean and simple Shopify checkout experience.
Botiga is a powerful WooCommerce theme designed to build high-converting online stores. While the theme itself is free, integrating the premium Botiga Pro plugin is required to unlock advanced functionalities.
Among these advanced features, as we've explored in this tutorial, are the Shopify-like checkout page layouts included with Botiga Pro.
To get started, simply install Botiga and Botiga Pro on your website, import a starter site, and enable a checkout layout from the Customizer.
Take these steps, and a Shopify-like checkout page will be up and running in your WooCommerce store in no time!

Related Posts


