Google address autocomplete suggests real street addresses as a customer types at checkout, cutting down the failed deliveries that come from typos and incomplete entries. This guide sets it up with Merchant Pro's module: get a Google Places API key, paste it in, and enable it.
Prerequisites
Before starting, two things need to be in place. Neither is optional, and both come with a real cost or commitment, so it is worth knowing up front rather than discovering mid-setup.
- A Merchant Pro license. The Google Address Autocomplete module is one of Merchant Pro's 40+ modules.
- A Google Cloud billing account with a credit or debit card on file. Google requires this to issue a Places API key, even though the API has a free monthly usage tier (details below). No charge happens at this stage, but the card is mandatory before Google will generate a key.
Generate a Google Places API Key
The autocomplete suggestions come from Google, not from WooCommerce or Merchant, so the store needs its own Google Places API key before the module can do anything. This is a one-time setup per site.
Sign into Google Cloud Console
Open the Google Cloud Console and sign in with a new or existing Google account.
Create a billing account
Google requires a billing account before it will issue a Places API key, even for usage that stays inside the free tier. Go to Billing on the left side of the console, fill in the form, and add a credit or debit card. This step does not charge the card by itself.

Verified on Google Maps Platform pricing, Google's free-usage model for the Places API changed on March 1, 2025. The old $200-per-month credit no longer exists. In its place, Google gives a set number of free API calls per month, split by product tier: 10,000 per SKU on Essentials, 5,000 on Pro, 1,000 on Enterprise.
New accounts also get a one-time $300 trial credit. For a small store, checkout-page autocomplete calls are unlikely to come close to the Essentials free tier in a normal month.
If usage does exceed the free monthly allowance for a given API, Google bills for the overage. Set a budget alert in Google Cloud's Billing settings before moving on. It costs nothing to set up and it is the difference between “found out from a bill” and “found out from an email,” which matters a lot more than the setup itself.
Create a project
On the Console dashboard, open Select a project at the top and click New Project. Name it something identifiable, like “(Your Store Name) Address Autocomplete,” and click Create. It takes a few seconds for the project to be ready.

Enable the Places API
Go to APIs & Services → Library, search for Places API, select it, and click Enable.

Create and restrict the API key
An unrestricted API key can be used by anyone who gets hold of it, against the store's own Google Cloud billing. Restricting it to the store's domain closes that off, and it takes about a minute.
Go to APIs & Services → Credentials, click Create Credentials, and choose API key. A key appears immediately. Before leaving the page:
- Give the key a title.
- Under Set an application restriction, choose Website.
- Add the store's domain.
- Under API restrictions, choose Restrict key.
- Select Places API from the dropdown.
- Click Save.
The key can take a few minutes to become active after saving. That delay is the single most common cause of “it's not working” reports on a fresh setup. Worth knowing before jumping to the troubleshooting section below.
Set Up the Module in Merchant Pro
With the API key ready (or activating), the rest happens inside WordPress, not Google Cloud.
Open the Google Address Autocomplete module
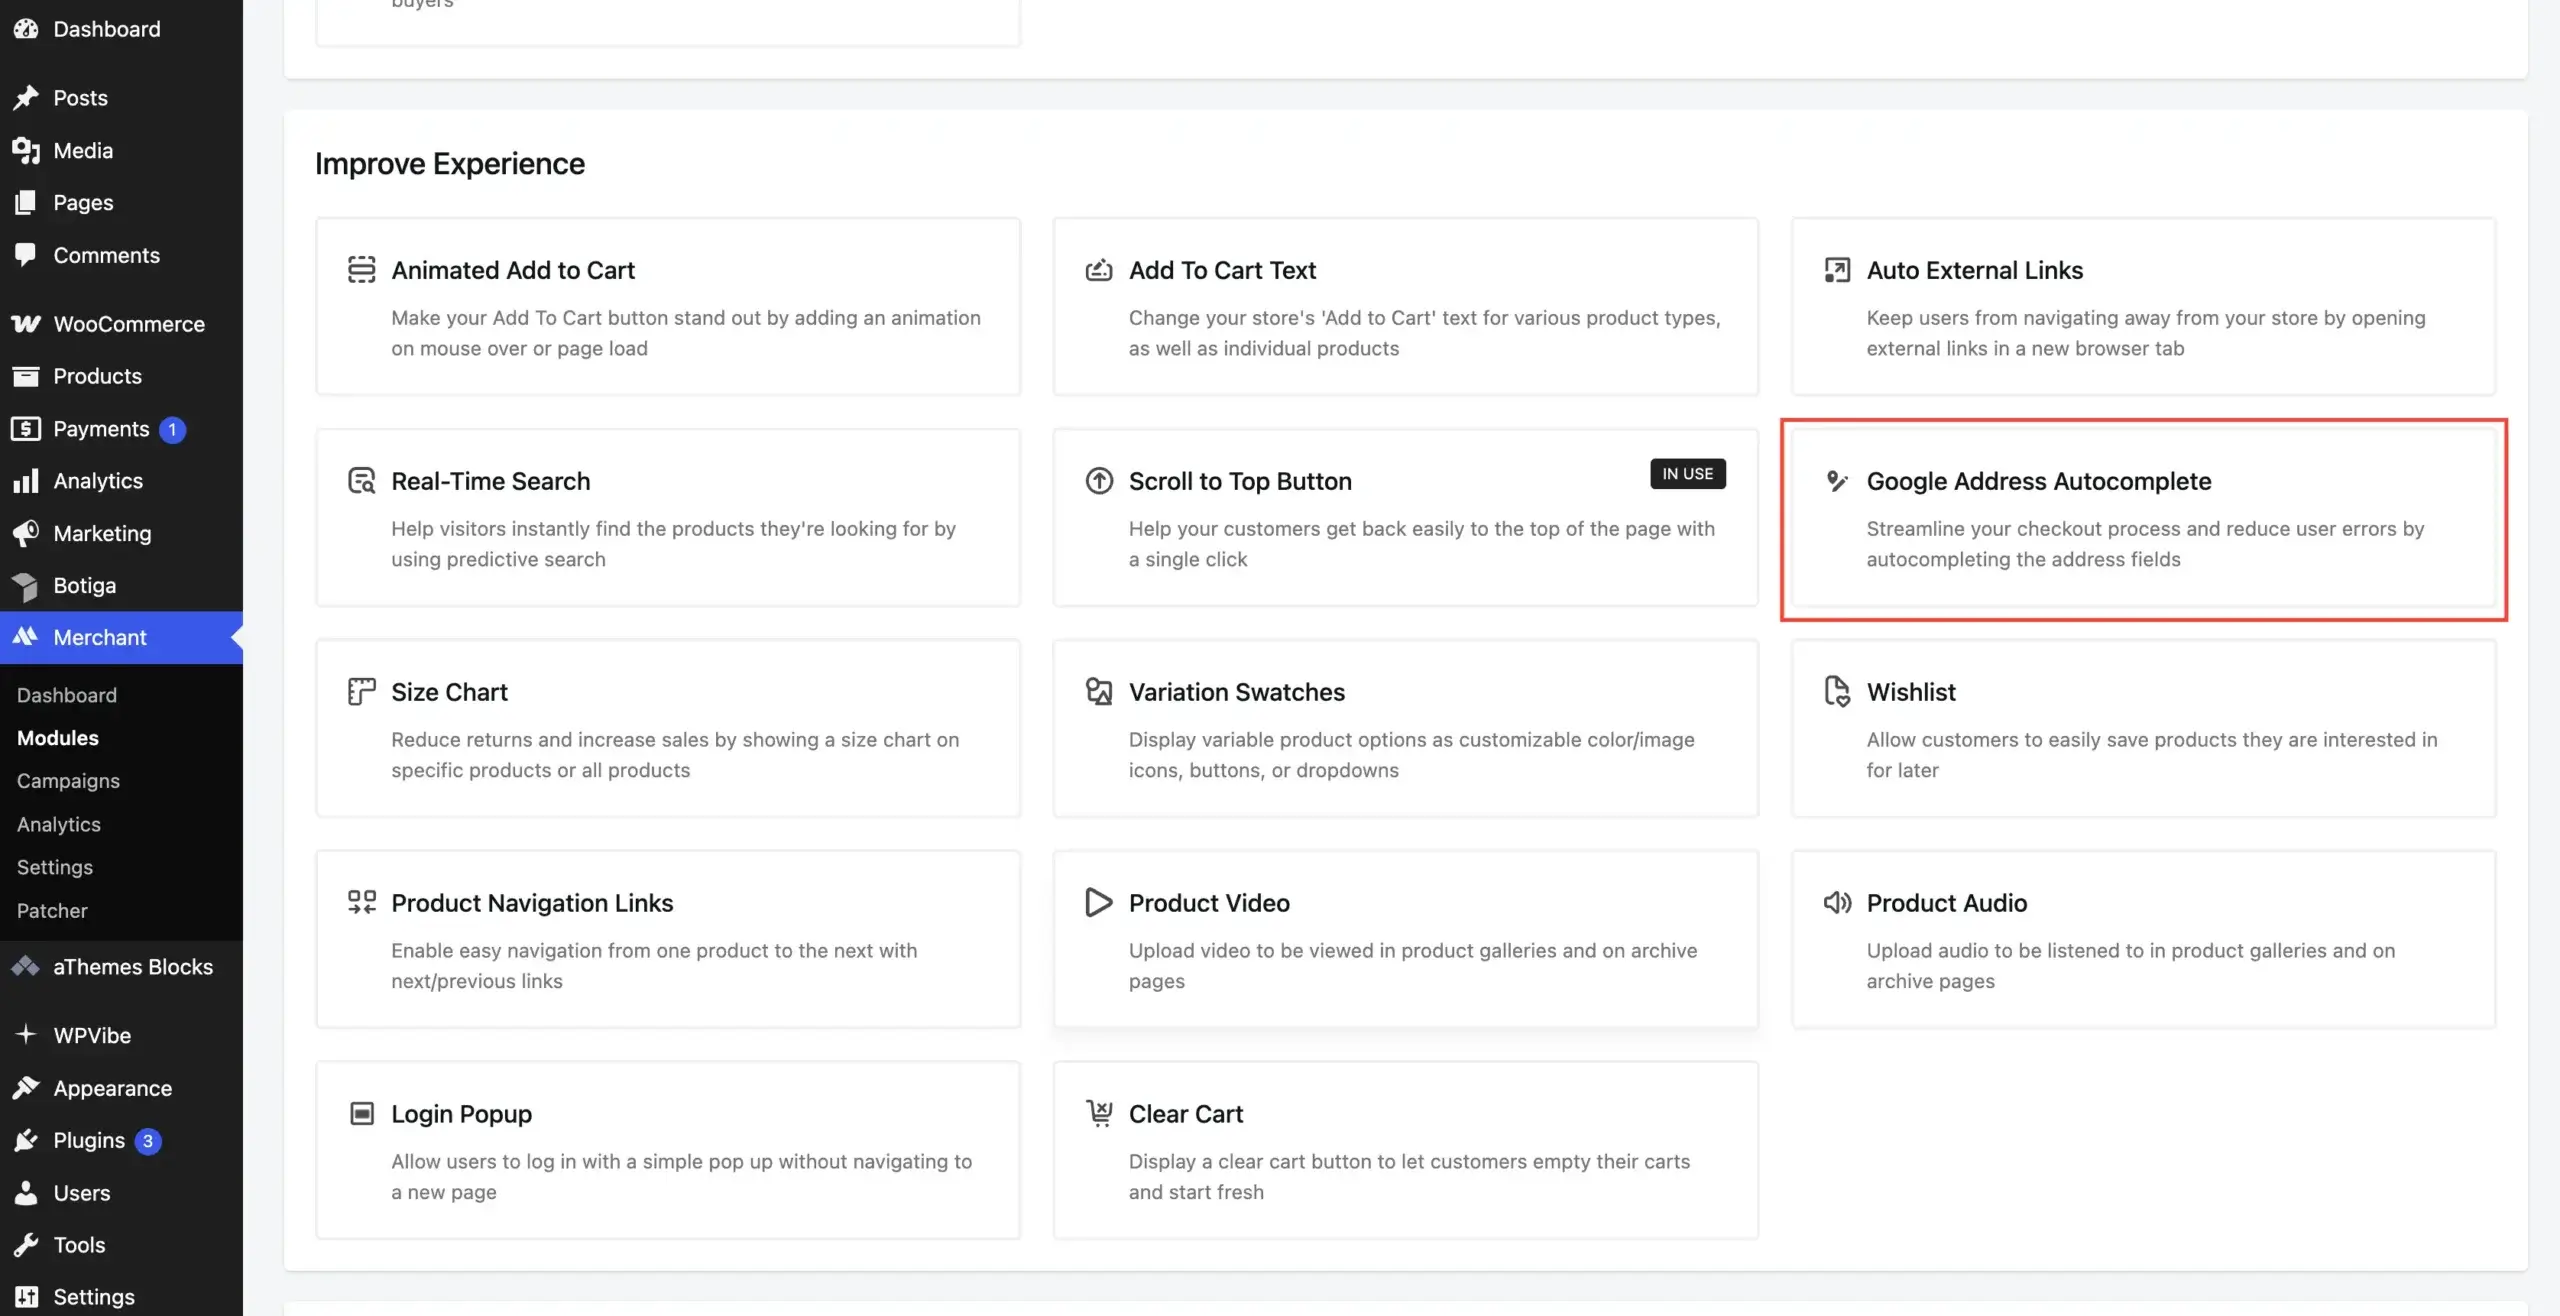
After purchasing, installing and activating Merchant Pro, a Merchant menu item appears in the WordPress admin sidebar. Open it and select Google Address Autocomplete.
Enter the API key and enable the module
Paste the Places API key from Step 2 into the module's settings field. Optional parameters like language and region are available under Optional API URL Parameters, useful for biasing suggestions toward a specific country.
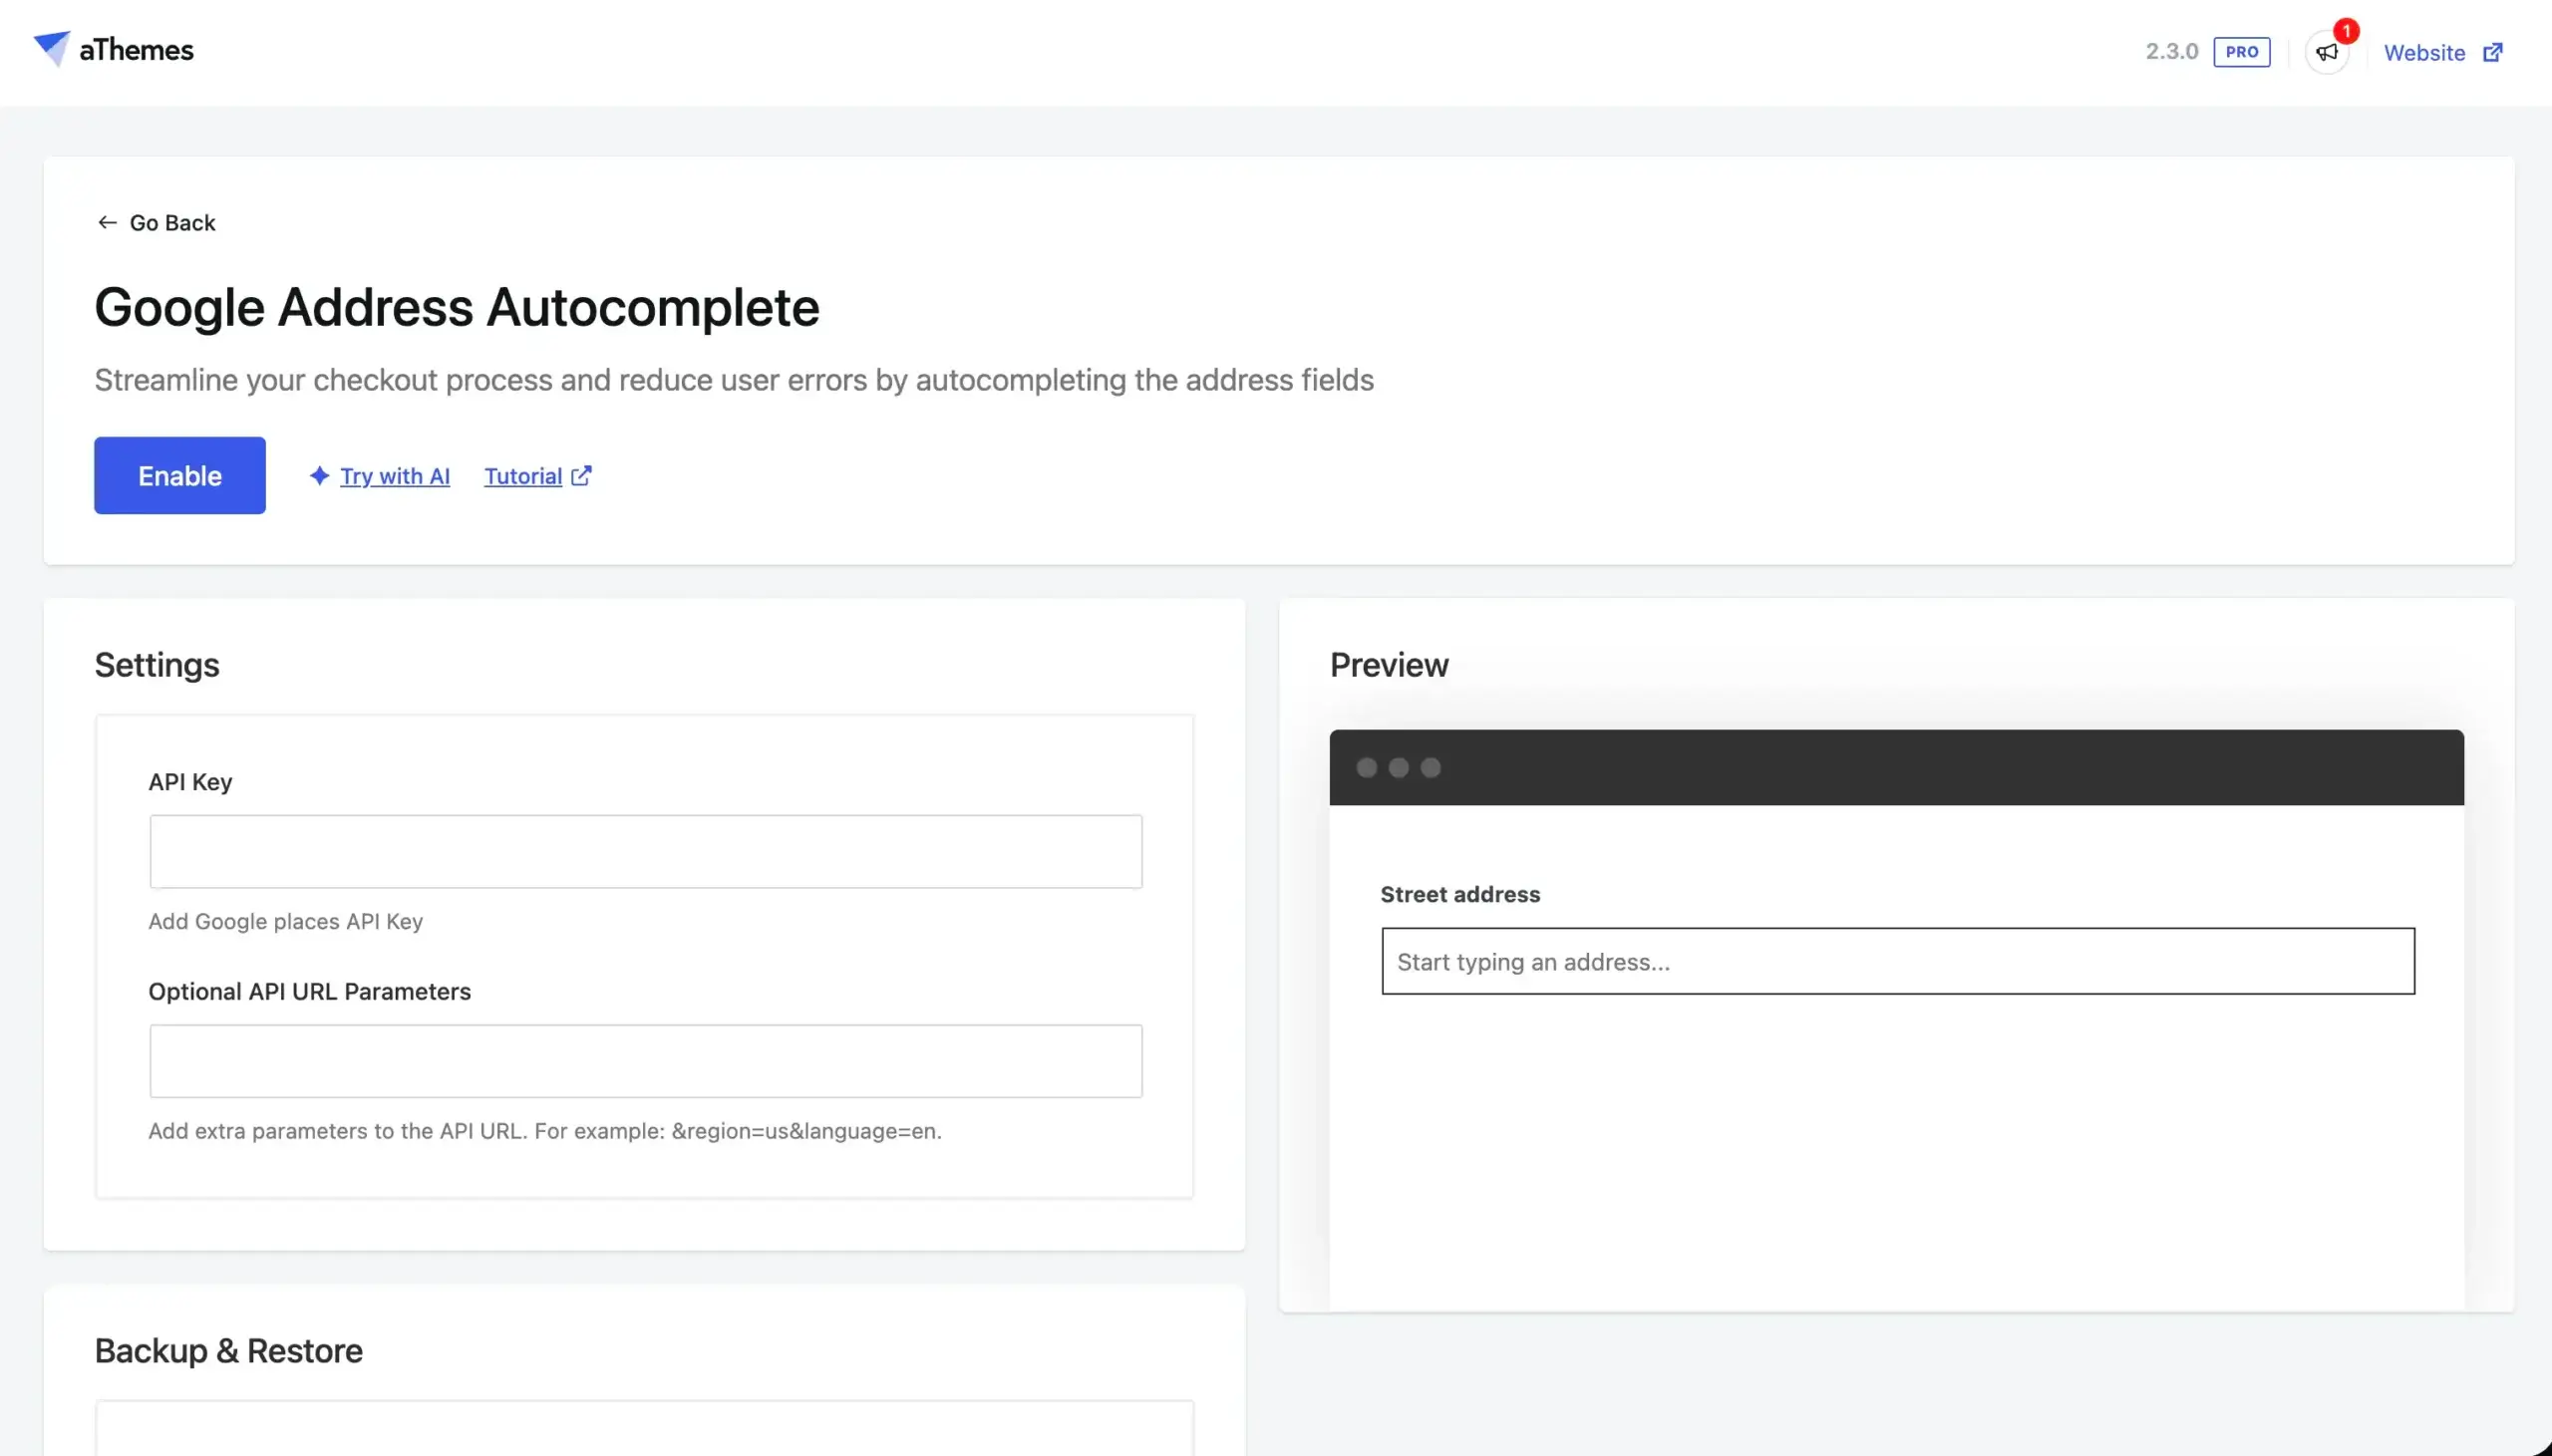
Click Enable, then Save. Saving matters: leaving the page without it means the key and settings are lost.
Check It on the Checkout Page
After enabling the module, I recommend that you check if it’s working properly on the checkout page of your WooCommerce store.
Here’s what Google address autocomplete looks like on the checkout page of my demo site:

Video Walkthrough
For a live demo of the Google Address Autocomplete module you can watch the video below:
Troubleshooting
Autocomplete doesn't appear at all
Most often this is the API key still activating. Google's own documentation notes a short propagation delay after a key is created or its restrictions are changed. Wait five to ten minutes, then reload the checkout page.
If it still doesn't appear, double-check that Places API is the one selected under API restrictions on the key, not a different Maps product.
If you require assistance in creating the API key, consult these help docs or seek aid from the Google Cloud Community.
“This API key is not authorized” or a similar console error
This means the website restriction on the key doesn't match the store's actual domain, including the www or non-www variant. Go back to APIs & Services → Credentials in Google Cloud Console, open the key, and confirm the domain listed matches the storefront URL exactly.
Suggestions don't include the customer's country
If the Optional API URL Parameters restrict results to specific countries, a customer outside that list sees no suggestions at all, not an error. Review the country/region parameter under module settings if the store ships internationally.
A note on privacy
Adding the Google Places script to checkout means a third-party request fires as soon as a customer starts typing, before they've necessarily agreed to anything. For stores serving EU customers, that is worth routing behind whatever cookie or consent tool the store already uses, not firing unconditionally on every visit. If you are not using cookie or consent, I recommend to checkout WPConsent.
Conclusion
Google address autocomplete removes one of the more common sources of failed deliveries: a mistyped or incomplete address at checkout.
Quick rundown:
- Purchase, install, and activate Merchant Pro.
- Generate a Google Places API key, with a billing account and budget alert in place.
- Enter the key into the Google Address Autocomplete module and enable it.
- Check the checkout page, on both classic and block checkout if the store uses the block editor.
If you have any questions about how to enable Google address autocomplete in your WooCommerce store, let us know in the comments section below.

Related Posts